How Should You Set Up Your Local Development Environment?
Use Docker Compose. It gives every developer on the team an identical environment, starts in seconds, and is defined in a single docker-compose.yml file committed to the repo. No more "works on my machine" problems, no multi-gigabyte VMs per project, and no manual package installation across different operating systems.
This article compares three approaches to setting up a local development environment — installing services directly, using virtual machines with Vagrant, and using Docker Compose — and explains why containers are the best default choice.
What are the main approaches to setting up a local dev environment?
There are three common strategies, each building on the limitations of the previous one:
- Direct install — Install every service (web server, database, language runtime) directly on your machine using package managers.
- Virtual machines — Run a shared VM image (typically with VirtualBox and Vagrant) so every developer gets the same OS and software stack.
- Containers — Define services in a
docker-compose.ymlfile and run them as lightweight containers with Docker Compose.
Comparison table
| Direct install | Vagrant VM | Docker Compose | |
|---|---|---|---|
| Setup time | 30–60 min (manual steps) | 10–20 min (first boot) | 1–5 min (docker compose up) |
| Environment consistency | Low — varies by OS and version | High — same VM image for everyone | High — same containers for everyone |
| Resource usage | Low (native processes) | High (full OS per project) | Low (shared kernel, no guest OS) |
| Cross-OS support | Requires different instructions per OS | Same Vagrantfile across OS | Same docker-compose.yml across OS |
| Reproducibility | Manual, error-prone | Automated via provisioners | Fully declarative in YAML |
| Multi-project overhead | Conflicting versions possible | One full VM per project | Shared Docker daemon, minimal overhead |
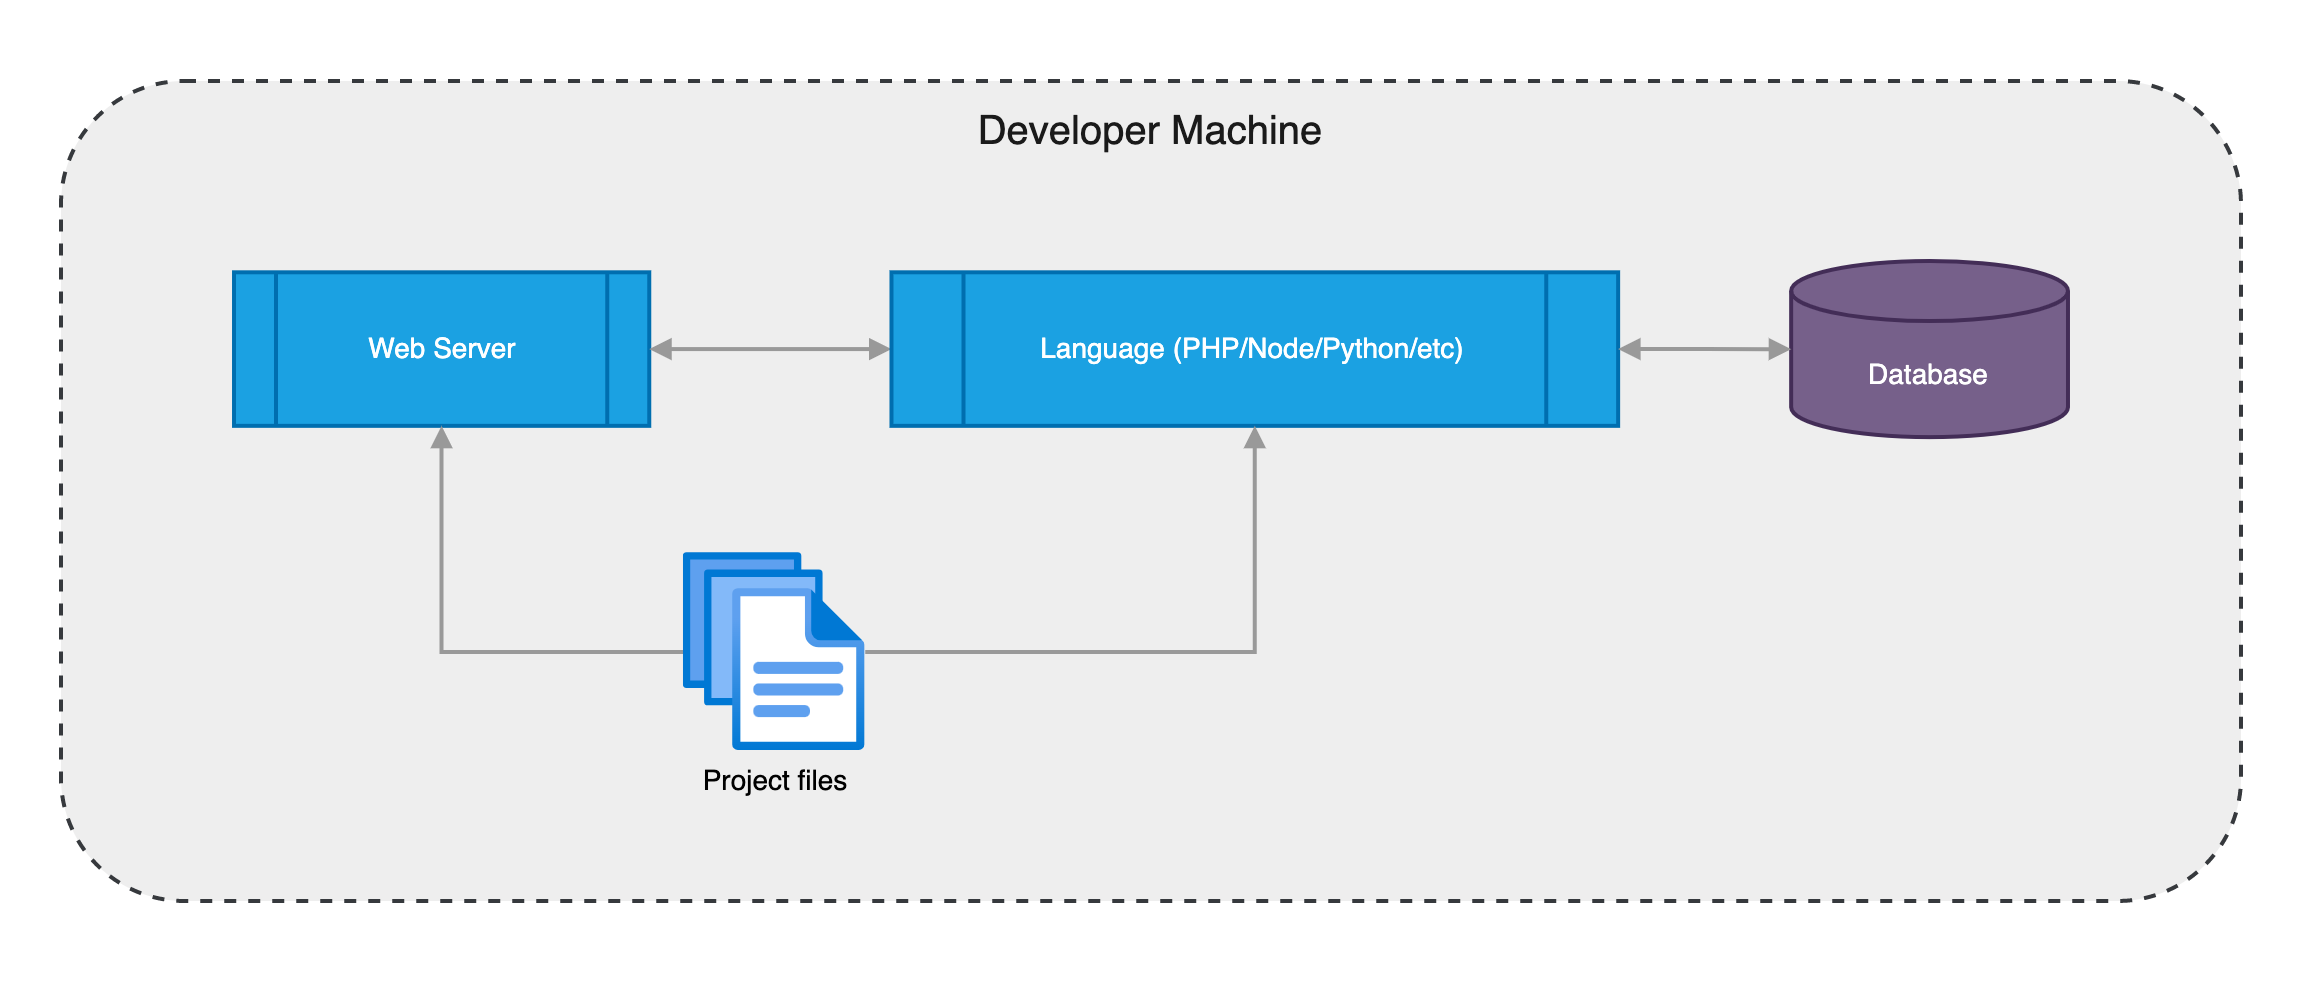
What happens when you install services directly on your machine?
The simplest approach is installing everything on your host OS. A typical web project requires a web server (Apache or Nginx), a language runtime (PHP, Node.js, Python), and a database (MySQL or PostgreSQL). You install each one, configure virtual hosts, create database users, set permissions, and repeat for every additional service.
Package managers make installation easier. On macOS the standard tool is Homebrew. On Ubuntu/Debian you use apt, on RedHat/CentOS you use yum, and on Windows the most popular option is Chocolatey.
Even with package managers, you still need manual configuration:
- Create virtual hosts in the web server and point them to your application
- Create database users, databases, and grant the correct permissions
- Configure your application with the database credentials
- Repeat for every additional service (Redis, Elasticsearch, etc.)
This works for a solo developer on a single project, but problems appear quickly in a team:
- Inconsistent environments. Different developers run different operating systems and different package versions. A test that passes on one machine fails on another.
- Painful reinstalls. If you reinstall your OS or get a new machine, you repeat every step from scratch. Setup instructions must be written separately for macOS, Linux, and Windows.
- Version conflicts. Working on multiple projects that require different versions of the same software (e.g., Node 18 vs Node 20, MySQL 5.7 vs 8.0) creates conflicts on a single host.
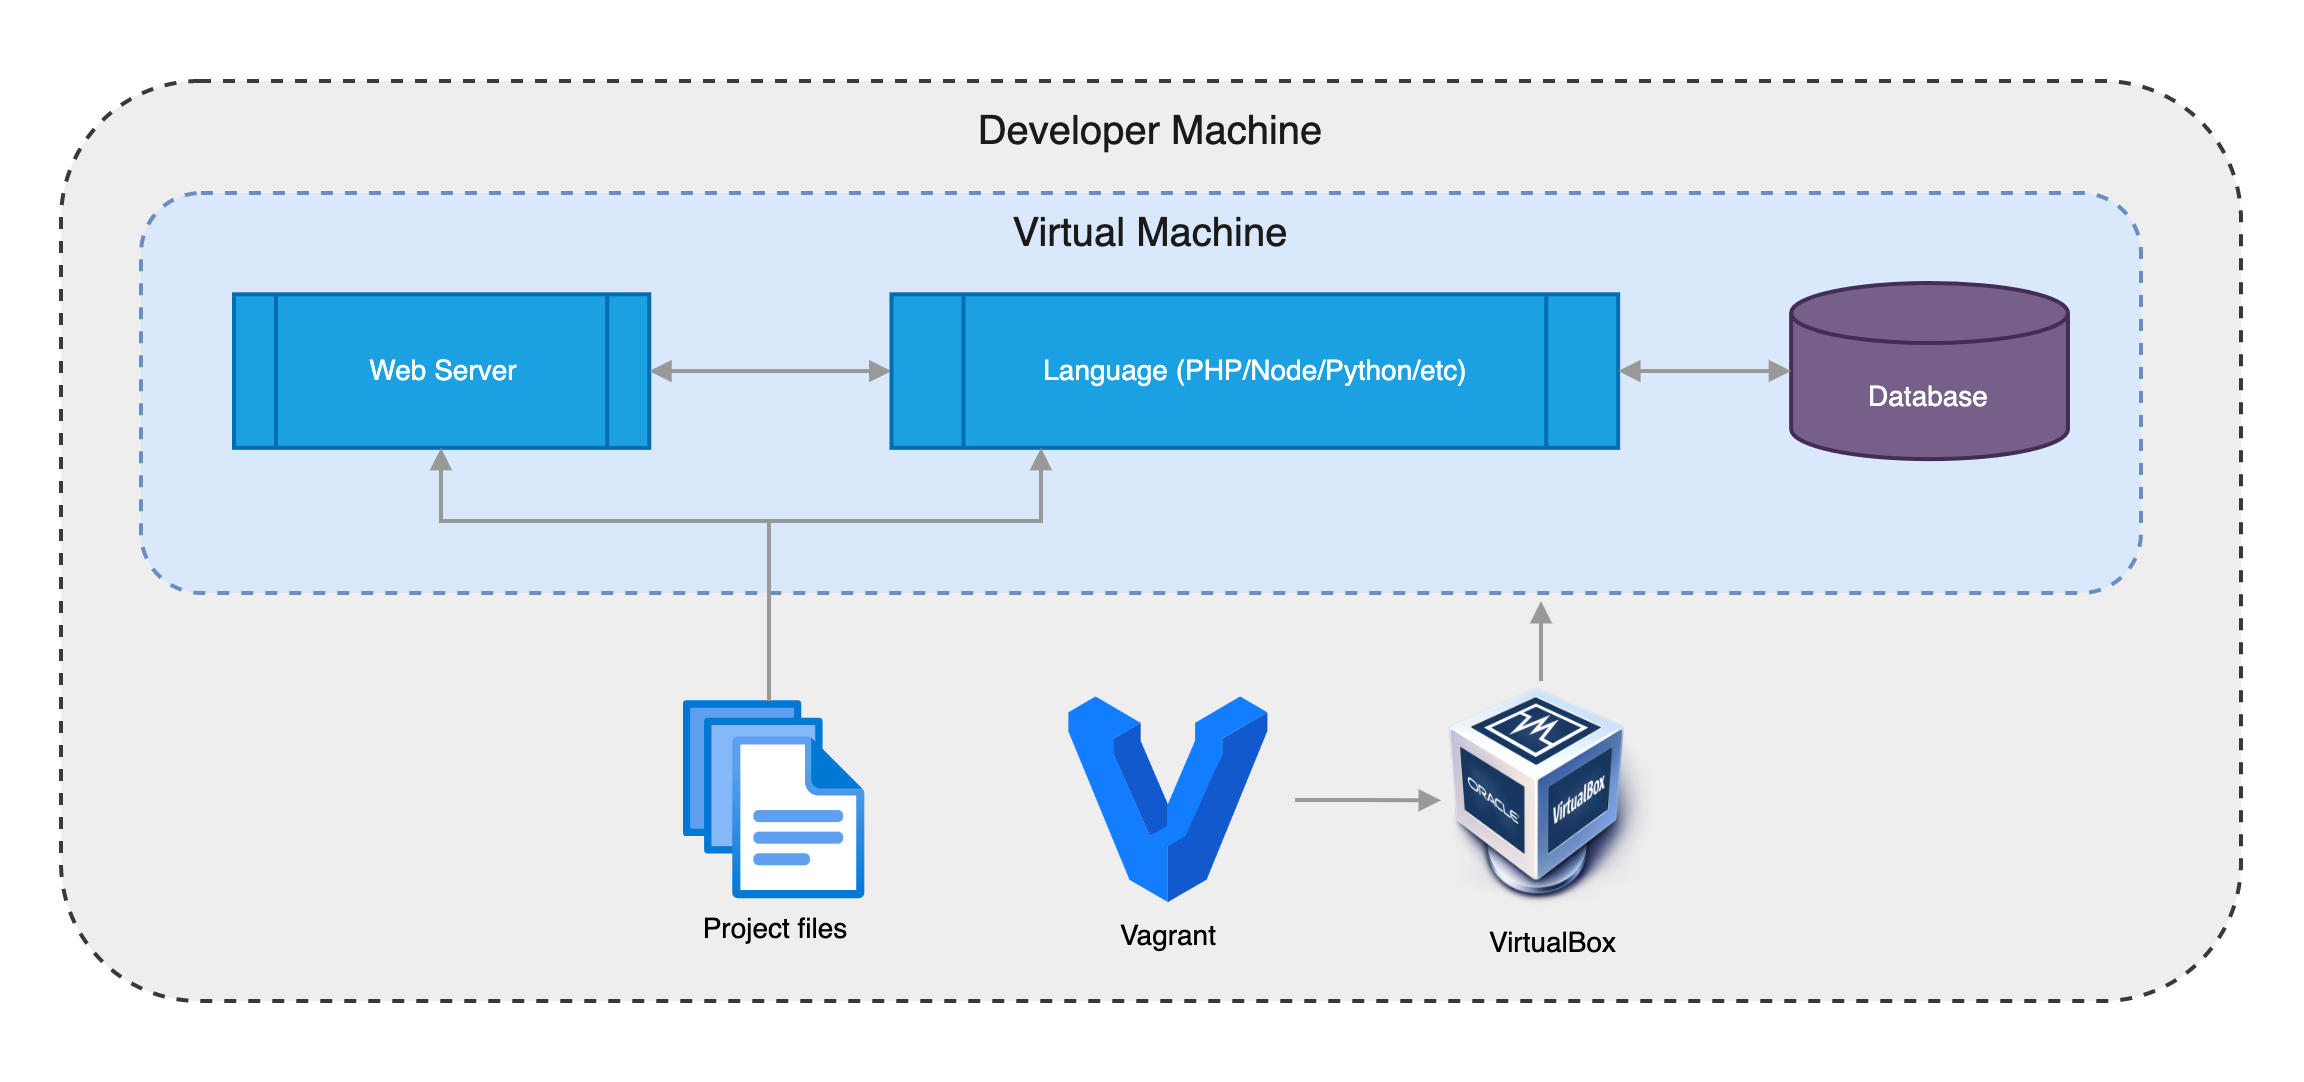
Can virtual machines solve the consistency problem?
Yes. By running a virtual machine with a fixed OS (e.g., Ubuntu 22.04), every developer gets the same environment regardless of their host OS. VirtualBox is a free hypervisor that runs on macOS, Windows, and Linux.
Creating VMs manually is slow, so the standard tool for automating this is Vagrant. You create a Vagrantfile in your project root and run vagrant up to build and start the VM. A minimal Vagrantfile looks like this:
Vagrant.configure("2") do |config|

  #
  # Use Ubuntu 22.04 LTS (Jammy Jellyfish)
  #
  config.vm.box = "ubuntu/jammy64"

end
Vagrant downloads the box image, creates the VM, and mounts your project files into /vagrant inside the guest. Boxes are versioned, so you can pin a specific OS release for the entire team.
To install software inside the VM automatically, Vagrant supports provisioning with shell scripts or configuration management tools like Ansible, Chef, Puppet, or Salt. Running vagrant provision sets up the full environment in one command.
A Vagrantfile with Ansible provisioning:
Vagrant.configure("2") do |config|

  #
  # Use Ubuntu 22.04 LTS (Jammy Jellyfish)
  #
  config.vm.box = "ubuntu/jammy64"

  #
  # Run Ansible from the Vagrant Host
  #
  config.vm.provision "ansible" do |ansible|
    ansible.playbook = "playbook.yml"
  end

end
Vagrant is a significant improvement over direct installation — the environment is consistent and automated. However, VMs have inherent drawbacks:
- Slow startup. The first boot downloads and imports the box image, then provisions all packages. Even subsequent boots take longer than containers.
- High disk usage. Each project needs its own VM, and each VM consumes several gigabytes of storage.
- High memory usage. Running multiple projects simultaneously means running multiple full operating systems, which quickly exhausts available RAM.
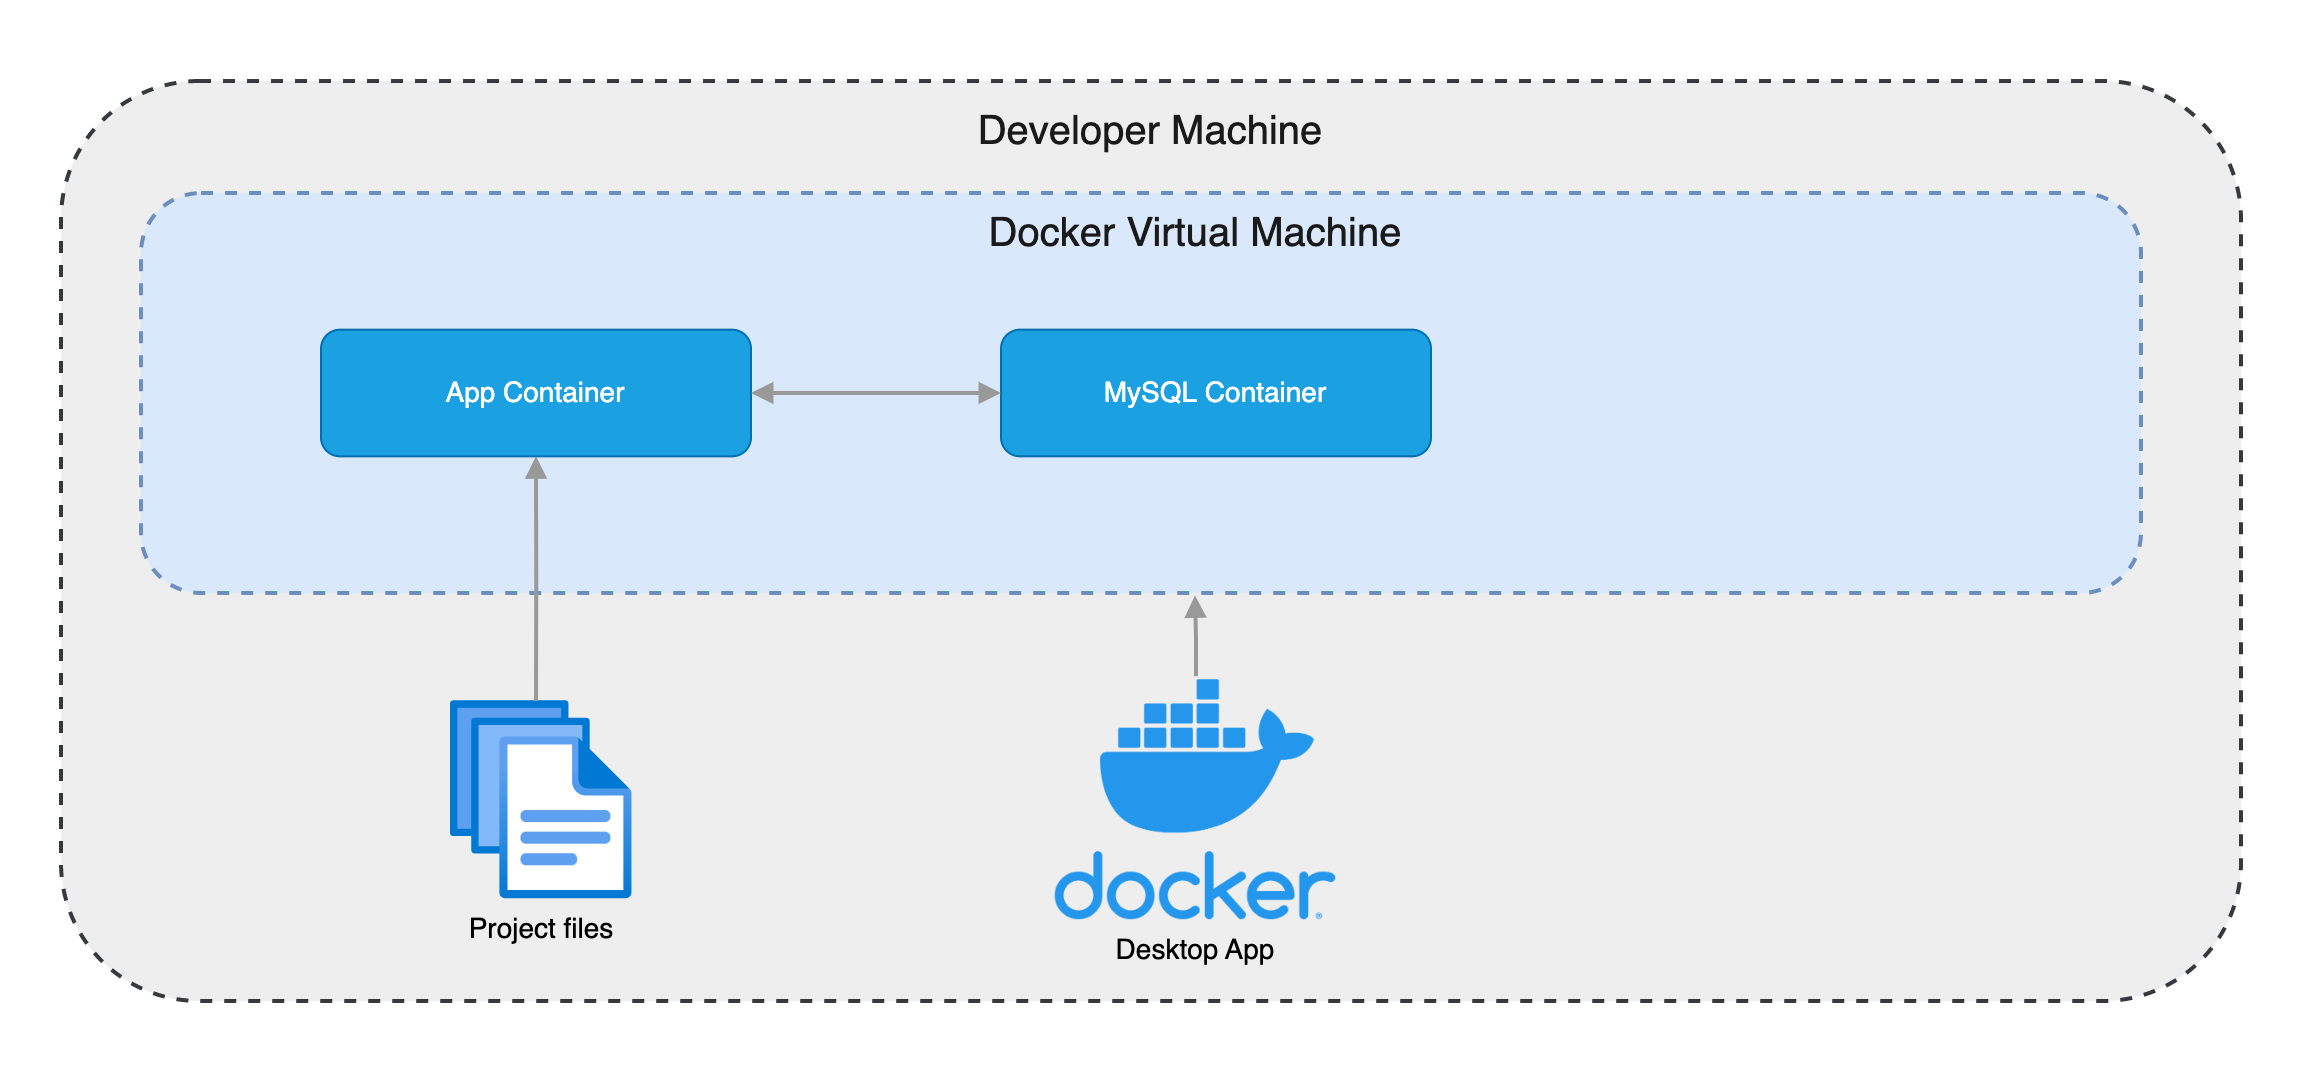
Why is Docker Compose the best option for local development?
Containers solve the resource problems of VMs because they share the host kernel instead of running a full guest operating system. A container starts in seconds, uses megabytes instead of gigabytes, and dozens of containers can run on a single machine without noticeable overhead.
Instead of installing software, you pull pre-built images from Docker Hub. Official images exist for nearly every service you might need: Apache, Nginx, PHP, Node.js, MySQL, and hundreds more. Each image includes installation instructions, usually requiring just a few environment variables.
On macOS and Windows, containers run inside a lightweight VM managed transparently by one of these tools:
- Docker Desktop — The most popular option for running Docker on macOS and Windows.
- Podman — An alternative container engine with the same CLI interface as the
dockercommand.
On Linux, Docker runs natively without a VM.
Docker Compose lets you define all your project's services in a single docker-compose.yml file. Here is an example with PHP 8.1, Apache, and MySQL:
version: '3'
services:
    app:
        image: 'php:8.1-apache'
        ports:
            - '80:80'
        volumes:
            - '.:/var/www/html'
        depends_on:
            - mysql
    mysql:
        image: 'mysql:8.0'
        environment:
            MYSQL_ROOT_PASSWORD: 'rootpassword'
            MYSQL_ROOT_HOST: "%"
            MYSQL_DATABASE: 'appdb'
            MYSQL_USER: 'app'
            MYSQL_PASSWORD: 'appsecret'
            MYSQL_ALLOW_EMPTY_PASSWORD: 1
Running docker compose up starts both containers. Running docker compose stop stops them. Any developer on the team can clone the repo, run one command, and have the full environment running — regardless of their operating system.
Docker Compose also prepares your project for production. You can create a Dockerfile at the project root to build and publish an image in your CI/CD pipeline, ready to deploy. To make sure your Dockerfile follows best practices before building, analyze it with Dockadvisor.
Which approach should you choose?
Choose Docker Compose if you want a fast, consistent, low-overhead development environment that works the same on every developer's machine. This is the right choice for the vast majority of projects.
Choose Vagrant VMs if your project requires a specific Linux kernel version, custom kernel modules, or system-level configuration that containers cannot replicate. This is rare but occurs in embedded systems development or kernel-level work.
Choose direct install if you are working alone on a single-tool project (e.g., a standalone Python script) where the overhead of Docker is not justified.
For most teams, Docker Compose is the clear default. It is faster to set up, lighter on resources, consistent across operating systems, and doubles as the foundation for your deployment pipeline.
Once your local environment runs on containers, you can take your workflow further. Deckrun deploys those same containers to production on managed cloud providers — no Kubernetes expertise required. Paired with preview environments, every pull request gets its own isolated, production-like deployment for testing before merge.
Frequently asked questions
Do I need to learn Docker to use Docker Compose?
You need basic Docker concepts — images, containers, volumes, and ports — but Docker Compose abstracts most of the complexity. The docker-compose.yml file is declarative YAML, and the two commands you use daily are docker compose up and docker compose stop. Most developers learn enough Docker to be productive in under an hour.
Can I use Docker Compose with any programming language?
Yes. Docker Hub has official images for every major language and framework: Node.js, Python, Ruby, PHP, Go, Java, .NET, and Rust. If an official image does not exist, you can write a simple Dockerfile to build your own. The docker-compose.yml file is language-agnostic.
How does Docker Compose handle database persistence?
By default, data inside a container is lost when the container is removed. To persist database data across restarts, add a named volume in your docker-compose.yml. For example, volumes: ['mysql_data:/var/lib/mysql'] stores MySQL data in a Docker-managed volume that survives container rebuilds.
Is Docker Compose suitable for production?
Docker Compose is designed for development and testing, not production orchestration. For production, use a container orchestrator like Kubernetes or a platform like Deckrun that manages the deployment infrastructure for you. The advantage is that the same container images you build locally are the ones that run in production.
Does Docker Compose work on Windows?
Yes. Docker Desktop for Windows includes Docker Compose. It runs containers inside a lightweight WSL 2 (Windows Subsystem for Linux) VM. The same docker-compose.yml file works on Windows, macOS, and Linux without modification.