How Do You Create DigitalOcean Droplets with Terraform?

To create a DigitalOcean Droplet with Terraform, you define a digitalocean_droplet resource in a .tf file, configure the DigitalOcean provider with an API token, then run terraform init and terraform apply. Terraform provisions the Droplet on DigitalOcean's infrastructure and tracks its state so you can update or destroy it later with a single command.
Terraform is a declarative, open-source infrastructure-as-code tool created by HashiCorp. Instead of clicking through the DigitalOcean control panel, you write HCL (HashiCorp Configuration Language) files that describe the exact infrastructure you want — Droplets, Firewalls, Load Balancers, DNS records — and Terraform creates, modifies, or destroys those resources to match your configuration. This tutorial walks through two complete examples: a single Droplet with a Firewall, and a multi-Droplet setup with a Load Balancer and segmented Firewalls.
How Do You Authenticate Terraform with DigitalOcean?
Terraform needs two things before it can create DigitalOcean resources: a DigitalOcean API token and an SSH key fingerprint.
How do you get a DigitalOcean API token?
Generate a Personal Access Token from the DigitalOcean control panel by following their guide on How to Create a Personal Access Token. Then export it as an environment variable:
export TF_VAR_do_token=6aa82264bb900dd56909d6cb8432439b55211c996cb16da733679d960b5ef1e1
Every environment variable prefixed with TF_VAR_ is automatically available inside Terraform as a variable. Using environment variables keeps API tokens out of configuration files so secrets are never accidentally committed to your git repository.
How do you add your SSH key to Terraform?
To SSH into Droplets after creation, add your public key to your DigitalOcean account following their guide on How to Upload SSH Public Keys to a DigitalOcean Account. Then get your key fingerprint — you can find it in the DigitalOcean SSH keys page or compute it locally:
ssh-keygen -E md5 -lf ~/.ssh/id_rsa.pub | awk '{print $2}'|cut -d ':' -f2-
Export the fingerprint as an environment variable:
export TF_VAR_ssh_fingerprint=a5:20:d7:1a:51:83:17:bc:2d:0c:4b:51:26:ac:42:15
How Do You Create a Single DigitalOcean Droplet with Terraform?
This first example creates two resources using the DigitalOcean Terraform provider:
- A Droplet running Ubuntu to serve as a web server
- A Firewall that allows only SSH, HTTP, and HTTPS inbound traffic
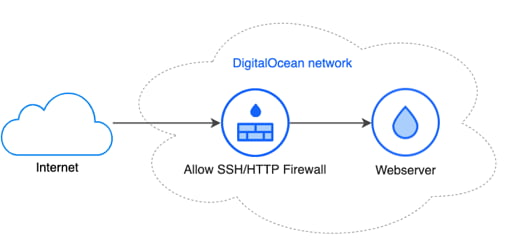
These resources are created in your default DigitalOcean project.
What goes in the variables.tf file?
Terraform uses a variables.tf file to declare input variables referenced in your main configuration. Create this file first:
variable "do_token" {
  description = "DigitalOcean API token"
}
variable "ssh_fingerprint" {
  description = "Fingerprint of your SSH key"
}
variable "droplet_image" {
  description = "Image identifier of the OS in DigitalOcean"
  default     = "ubuntu-20-04-x64"
}
variable "droplet_region" {
  description = "Droplet region identifier where the droplet will be created"
  default     = "sfo3"
}
variable "droplet_size" {
  description = "Droplet size identifier"
  default     = "s-1vcpu-1gb"
}
| Variable | Purpose | Default |
|---|---|---|
do_token | DigitalOcean API token for authentication | None (set via TF_VAR_do_token) |
ssh_fingerprint | SSH key fingerprint injected into Droplets | None (set via TF_VAR_ssh_fingerprint) |
droplet_image | OS image identifier | ubuntu-20-04-x64 |
droplet_region | Data center region | sfo3 (San Francisco) |
droplet_size | CPU and RAM tier | s-1vcpu-1gb (1 vCPU, 1 GB RAM) |
Variables without a default value must be provided at runtime — either through TF_VAR_ environment variables, a .tfvars file, or the -var flag.
How do you define the DigitalOcean provider in main.tf?
The main.tf file starts by declaring the DigitalOcean provider and passing your API token:
terraform {
  required_providers {
    digitalocean = {
      source = "digitalocean/digitalocean"
    }
  }
}

provider "digitalocean" {
  token = var.do_token
}
Next, define the Droplet resource. This creates a single Droplet named webserver with backups, monitoring, and your SSH key:
# Droplet
resource "digitalocean_droplet" "web" {
  image              = var.droplet_image
  name               = "webserver"
  region             = var.droplet_region
  size               = var.droplet_size
  backups            = true
  monitoring         = true
  private_networking = true
  ssh_keys = [
    var.ssh_fingerprint
  ]
}
How do you add a Firewall to a DigitalOcean Droplet?
Add a digitalocean_firewall resource that references the Droplet by its ID. This Firewall allows inbound SSH (port 22), HTTP (port 80), and HTTPS (port 443) traffic, plus all outbound traffic:
# Firewall
resource "digitalocean_firewall" "web" {
  name = "only-allow-ssh-http-and-https"

  droplet_ids = [digitalocean_droplet.web.id]

  inbound_rule {
    protocol         = "tcp"
    port_range       = "22"
    source_addresses = ["0.0.0.0/0", "::/0"]
  }

  inbound_rule {
    protocol         = "tcp"
    port_range       = "80"
    source_addresses = ["0.0.0.0/0", "::/0"]
  }

  inbound_rule {
    protocol         = "tcp"
    port_range       = "443"
    source_addresses = ["0.0.0.0/0", "::/0"]
  }

  inbound_rule {
    protocol         = "icmp"
    source_addresses = ["0.0.0.0/0", "::/0"]
  }

  outbound_rule {
    protocol              = "tcp"
    port_range            = "1-65535"
    destination_addresses = ["0.0.0.0/0", "::/0"]
  }

  outbound_rule {
    protocol              = "udp"
    port_range            = "1-65535"
    destination_addresses = ["0.0.0.0/0", "::/0"]
  }

  outbound_rule {
    protocol              = "icmp"
    destination_addresses = ["0.0.0.0/0", "::/0"]
  }
}
The droplet_ids argument creates a dependency — Terraform knows to create the Droplet first, then attach the Firewall to it.
Tip: Run terraform fmt at any time to auto-format your HCL files.
How Do You Initialize and Apply Terraform?
Three commands handle the full lifecycle: init, plan, and apply.
Step 1 — Initialize the project. Run terraform init once to download the DigitalOcean provider plugin:
$ terraform init

Initializing the backend...

Initializing provider plugins...
- Finding latest version of digitalocean/digitalocean...
- Installing digitalocean/digitalocean v1.22.2...
- Installed digitalocean/digitalocean v1.22.2 (signed by a HashiCorp partner, key ID F82037E524B9C0E8)

...

* digitalocean/digitalocean: version = "~> 1.22.2"

Terraform has been successfully initialized!
Step 2 — Preview changes. Run terraform plan to see exactly which resources Terraform will create without making any changes:
$ terraform plan

Refreshing Terraform state in-memory prior to plan...
The refreshed state will be used to calculate this plan, but will not be
persisted to local or remote state storage.


------------------------------------------------------------------------

An execution plan has been generated and is shown below.
Resource actions are indicated with the following symbols:
  + create

Terraform will perform the following actions:

  # digitalocean_droplet.web will be created
  + resource "digitalocean_droplet" "web" {
      ...
    }

  # digitalocean_firewall.web will be created
  + resource "digitalocean_firewall" "web" {
      ...
    }

Plan: 2 to add, 0 to change, 0 to destroy.

------------------------------------------------------------------------
Step 3 — Apply changes. Run terraform apply to create the resources. Terraform shows the plan and asks for confirmation before proceeding:
$ terraform apply

An execution plan has been generated and is shown below.
Resource actions are indicated with the following symbols:
  + create

Terraform will perform the following actions:

...

Plan: 2 to add, 0 to change, 0 to destroy.

Do you want to perform these actions?
  Terraform will perform the actions described above.
  Only 'yes' will be accepted to approve.

  Enter a value: yes

digitalocean_droplet.web: Creating...
digitalocean_droplet.web: Still creating... [10s elapsed]
digitalocean_droplet.web: Still creating... [20s elapsed]
digitalocean_droplet.web: Still creating... [30s elapsed]
digitalocean_droplet.web: Creation complete after 36s [id=207248896]
digitalocean_firewall.web: Creating...
digitalocean_firewall.web: Creation complete after 2s [id=854955d2-56a9-423e-83f4-fba75be71b3d]

Apply complete! Resources: 2 added, 0 changed, 0 destroyed.
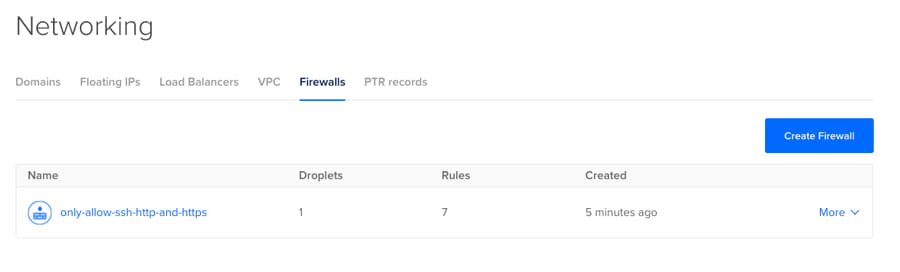
The Droplet and Firewall now appear in the DigitalOcean control panel:
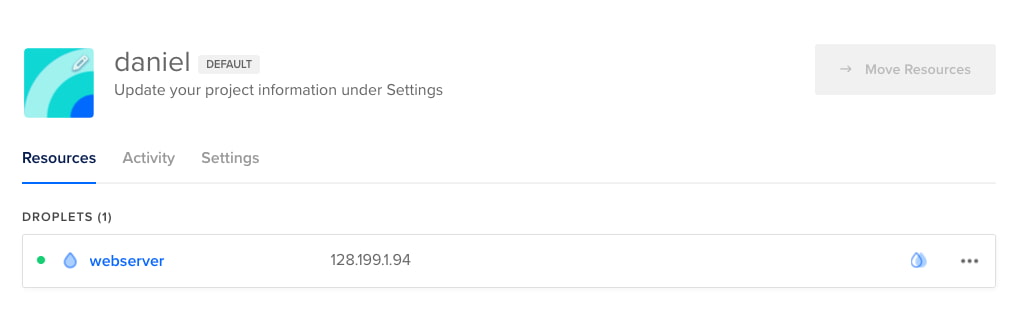
To tear down everything, run terraform destroy. Terraform deletes all resources it created in the correct dependency order.
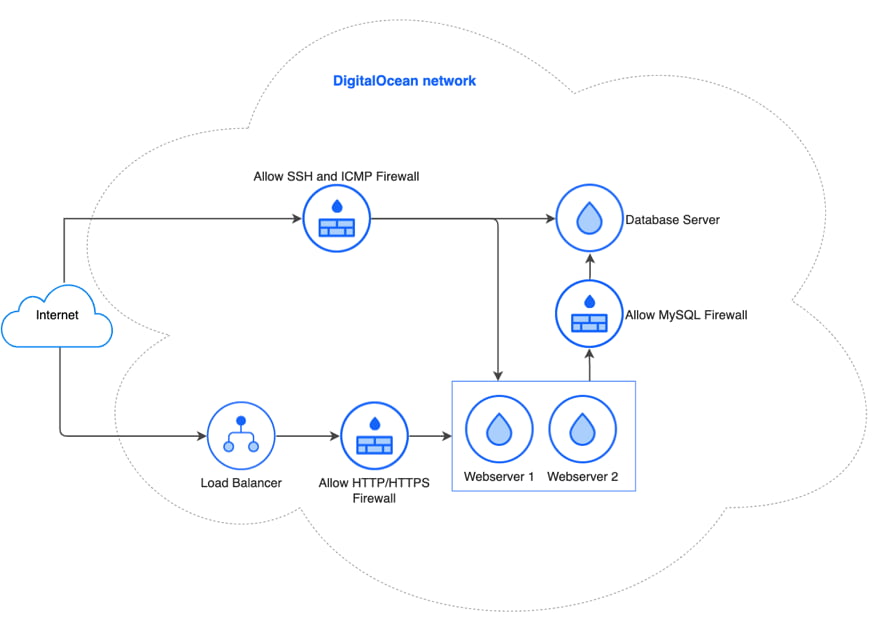
How Do You Create Multiple Droplets with a Load Balancer?
A production setup typically needs more than a single Droplet. This second example creates a complete multi-tier architecture:
- 2 web server Droplets behind a Load Balancer
- 1 database Droplet for MySQL
- A Load Balancer distributing HTTP traffic across the web servers
- 3 Firewalls with segmented access rules
The variables.tf file is identical to the single-Droplet example. Here is the updated main.tf.
The provider block is unchanged:
terraform {
  required_providers {
    digitalocean = {
      source = "digitalocean/digitalocean"
    }
  }
}

provider "digitalocean" {
  token = var.do_token
}
How do you use count to create multiple Droplets?
Terraform's count parameter creates multiple instances of a resource without duplicating code. Setting count = 2 creates two web server Droplets named webserver-0 and webserver-1:
# Droplets
resource "digitalocean_droplet" "webserver" {
  count              = 2
  image              = var.droplet_image
  name               = "webserver-${count.index}"
  region             = var.droplet_region
  size               = var.droplet_size
  backups            = true
  monitoring         = true
  private_networking = true
  ssh_keys = [
    var.ssh_fingerprint
  ]
}

resource "digitalocean_droplet" "database" {
  image              = var.droplet_image
  name               = "dbserver"
  region             = var.droplet_region
  size               = var.droplet_size
  backups            = true
  monitoring         = true
  private_networking = true
  ssh_keys = [
    var.ssh_fingerprint
  ]
}
The count.index expression gives each Droplet a unique name. You reference all instances with the splat expression digitalocean_droplet.webserver.*.id.
How do you add a DigitalOcean Load Balancer with Terraform?
The digitalocean_loadbalancer resource distributes traffic across Droplets. The droplet_ids argument accepts the splat expression to include all web server instances:
resource "digitalocean_loadbalancer" "public" {
  name   = "loadbalancer"
  region = var.droplet_region

  forwarding_rule {
    entry_port     = 80
    entry_protocol = "http"

    target_port     = 80
    target_protocol = "http"
  }

  healthcheck {
    port     = 22
    protocol = "tcp"
  }

  droplet_ids = digitalocean_droplet.webserver.*.id
}
The Load Balancer performs TCP health checks on port 22 to verify each web server is reachable before sending it traffic.
How do you configure Firewalls for a multi-Droplet setup?
Three Firewalls enforce network segmentation — each one restricts traffic to exactly what that tier needs:
resource "digitalocean_firewall" "ssh-icmp-and-outbound" {
  name = "allow-ssh-and-icmp"

  droplet_ids = concat(digitalocean_droplet.webserver.*.id, [digitalocean_droplet.database.id])

  inbound_rule {
    protocol         = "tcp"
    port_range       = "22"
    source_addresses = ["0.0.0.0/0", "::/0"]
  }

  inbound_rule {
    protocol         = "icmp"
    source_addresses = ["0.0.0.0/0", "::/0"]
  }

  outbound_rule {
    protocol              = "tcp"
    port_range            = "1-65535"
    destination_addresses = ["0.0.0.0/0", "::/0"]
  }

  outbound_rule {
    protocol              = "udp"
    port_range            = "1-65535"
    destination_addresses = ["0.0.0.0/0", "::/0"]
  }

  outbound_rule {
    protocol              = "icmp"
    destination_addresses = ["0.0.0.0/0", "::/0"]
  }
}

resource "digitalocean_firewall" "http-https" {
  name = "allow-http-and-https"

  droplet_ids = digitalocean_droplet.webserver.*.id

  inbound_rule {
    protocol                  = "tcp"
    port_range                = "80"
    source_load_balancer_uids = [digitalocean_loadbalancer.public.id]
  }

  inbound_rule {
    protocol                  = "tcp"
    port_range                = "443"
    source_load_balancer_uids = [digitalocean_loadbalancer.public.id]
  }
}

resource "digitalocean_firewall" "mysql" {
  name = "allow-mysql-traffic-form-webservers"

  droplet_ids = [digitalocean_droplet.database.id]

  inbound_rule {
    protocol           = "tcp"
    port_range         = "3306"
    source_droplet_ids = digitalocean_droplet.webserver.*.id
  }
}
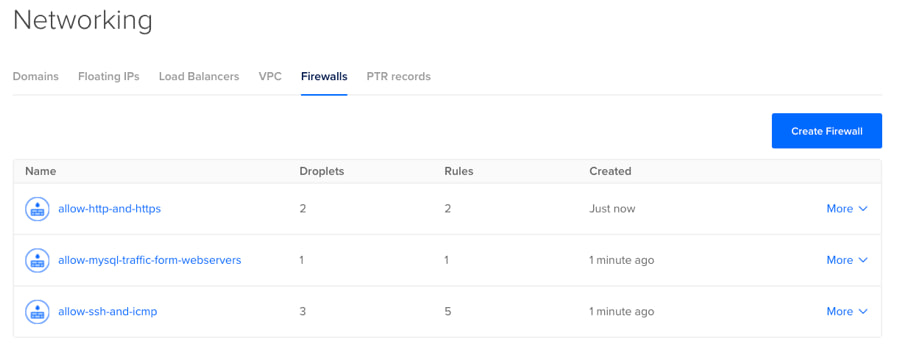
The key security pattern: the HTTP/HTTPS Firewall only accepts traffic from the Load Balancer (using source_load_balancer_uids), and the MySQL Firewall only accepts connections from the web server Droplets (using source_droplet_ids). This prevents direct public access to either the web servers or the database.
Running terraform apply creates all 7 resources:
$ terraform apply

An execution plan has been generated and is shown below.
Resource actions are indicated with the following symbols:
  + create

Terraform will perform the following actions:

  # digitalocean_droplet.database will be created
  + resource "digitalocean_droplet" "database" {
      ...
    }

  # digitalocean_droplet.webserver[0] will be created
  + resource "digitalocean_droplet" "webserver" {
      ...
    }

  # digitalocean_droplet.webserver[1] will be created
  + resource "digitalocean_droplet" "webserver" {
      ...
    }

  # digitalocean_firewall.http-https will be created
  + resource "digitalocean_firewall" "http-https" {
      ...
    }

  # digitalocean_firewall.mysql will be created
  + resource "digitalocean_firewall" "mysql" {
      ...
    }

  # digitalocean_firewall.ssh-icmp-and-outbound will be created
  + resource "digitalocean_firewall" "ssh-icmp-and-outbound" {
      ...
    }

  # digitalocean_loadbalancer.public will be created
  + resource "digitalocean_loadbalancer" "public" {
      ...
    }

Plan: 7 to add, 0 to change, 0 to destroy.

Do you want to perform these actions?
  Terraform will perform the actions described above.
  Only 'yes' will be accepted to approve.

  Enter a value: yes

digitalocean_droplet.webserver[1]: Creating...
digitalocean_droplet.webserver[0]: Creating...
digitalocean_droplet.database: Creating...
digitalocean_droplet.database: Still creating... [10s elapsed]
digitalocean_droplet.webserver[1]: Still creating... [10s elapsed]
digitalocean_droplet.webserver[0]: Still creating... [10s elapsed]
digitalocean_droplet.webserver[0]: Still creating... [20s elapsed]
digitalocean_droplet.database: Still creating... [20s elapsed]
digitalocean_droplet.webserver[1]: Still creating... [20s elapsed]
digitalocean_droplet.webserver[1]: Still creating... [30s elapsed]
digitalocean_droplet.webserver[0]: Still creating... [30s elapsed]
digitalocean_droplet.database: Still creating... [30s elapsed]
digitalocean_droplet.webserver[1]: Creation complete after 34s [id=207351077]
digitalocean_droplet.webserver[0]: Creation complete after 35s [id=207351078]
digitalocean_loadbalancer.public: Creating...
digitalocean_droplet.database: Creation complete after 35s [id=207351079]
digitalocean_firewall.mysql: Creating...
digitalocean_firewall.ssh-icmp-and-outbound: Creating...
digitalocean_firewall.mysql: Creation complete after 1s [id=39334ce2-b4d4-4a48-9930-a72dbdae8765]
digitalocean_firewall.ssh-icmp-and-outbound: Creation complete after 2s [id=bd50b05c-d792-42a9-ab44-44be8a47ad6d]
digitalocean_loadbalancer.public: Still creating... [10s elapsed]
digitalocean_loadbalancer.public: Still creating... [20s elapsed]
digitalocean_loadbalancer.public: Still creating... [30s elapsed]
digitalocean_loadbalancer.public: Still creating... [40s elapsed]
digitalocean_loadbalancer.public: Still creating... [50s elapsed]
digitalocean_loadbalancer.public: Still creating... [1m0s elapsed]
digitalocean_loadbalancer.public: Still creating... [1m10s elapsed]
digitalocean_loadbalancer.public: Still creating... [1m20s elapsed]
digitalocean_loadbalancer.public: Creation complete after 1m20s [id=b1304ac3-735d-49aa-b5f3-42a927b58de4]
digitalocean_firewall.http-https: Creating...
digitalocean_firewall.http-https: Creation complete after 1s [id=b7bb6df2-6b67-4a41-8554-38e55291d582]

Apply complete! Resources: 7 added, 0 changed, 0 destroyed.
The DigitalOcean control panel confirms all resources:
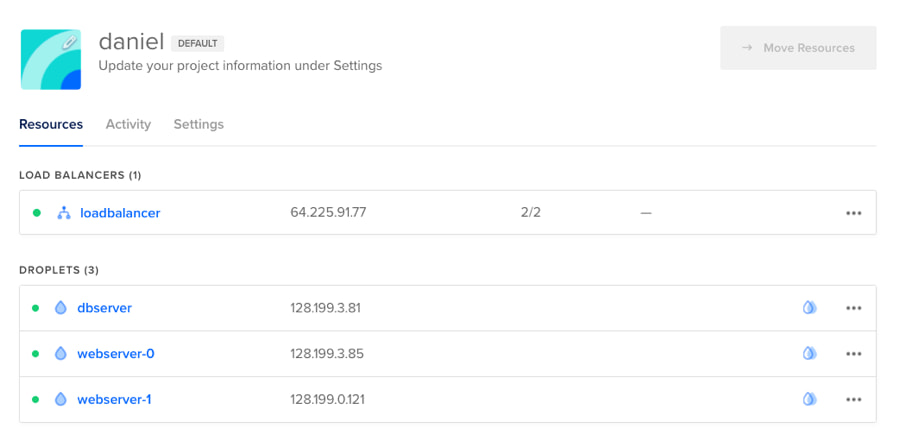
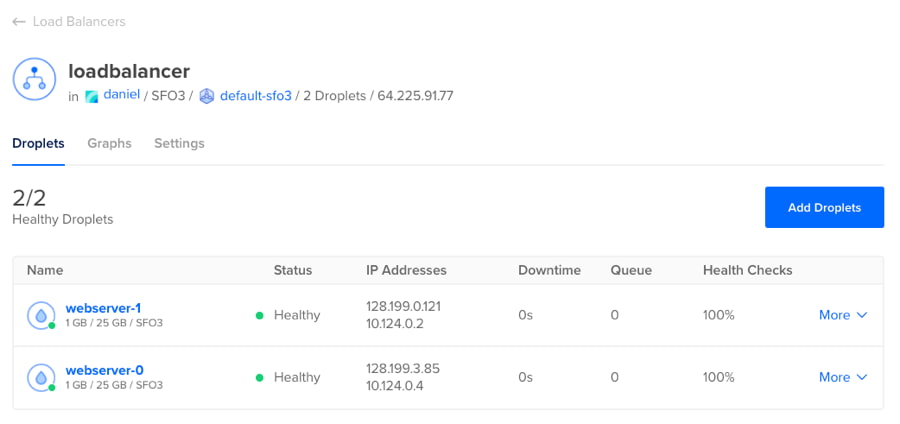
In the Load Balancer details, the Status column shows every web server as Healthy — the Load Balancer has confirmed each server is running and able to receive traffic via the TCP port 22 health check defined in the Terraform configuration.
Terraform Resource Summary
| Resource | Single-Droplet Example | Multi-Droplet Example |
|---|---|---|
digitalocean_droplet | 1 (web server) | 3 (2 web servers + 1 database) |
digitalocean_firewall | 1 (SSH + HTTP/HTTPS) | 3 (SSH, HTTP/HTTPS via LB, MySQL) |
digitalocean_loadbalancer | 0 | 1 |
| Total resources | 2 | 7 |
| Terraform commands | init → plan → apply | init → plan → apply |
Both examples use the same variables.tf file and the same three-command workflow. The only difference is the number and type of resources defined in main.tf.
What Comes After Terraform?
Terraform creates the infrastructure, but you still need to deploy and manage applications on those Droplets — installing runtimes, configuring web servers, setting up SSL, and handling updates. For teams that want to skip the infrastructure management entirely, Deckrun deploys applications to managed cloud providers with a single deck deploy command. No Terraform files, no server configuration, no Kubernetes expertise required.
For all available DigitalOcean resources beyond Droplets, Firewalls, and Load Balancers, see the Terraform DigitalOcean Provider documentation. It covers Domains, Droplet Snapshots, Projects, DNS Records, Spaces Buckets, Volumes, and more.
Frequently Asked Questions
Is Terraform free to use with DigitalOcean?
Yes. Terraform itself is open-source and completely free. You only pay for the DigitalOcean resources that Terraform creates — Droplets, Load Balancers, Firewalls (free), and other services at their standard DigitalOcean pricing. There is no additional cost for using Terraform as your provisioning tool.
How do you destroy Terraform-created DigitalOcean resources?
Run terraform destroy in the same directory as your .tf files. Terraform reads its state file to identify every resource it created, shows you a plan listing what will be deleted, and asks for confirmation. After you type yes, it deletes all resources in the correct dependency order — Firewalls and Load Balancers first, then Droplets.
Can Terraform manage existing DigitalOcean Droplets?
Yes, but you must import them first. Run terraform import digitalocean_droplet.web <droplet-id> to add an existing Droplet to Terraform's state file. After importing, you also need to write the corresponding resource block in your .tf file so Terraform knows the desired configuration. From that point forward, Terraform manages the Droplet like any other resource.
What is the difference between terraform plan and terraform apply?
terraform plan is a dry run — it compares your .tf files against the current state and shows exactly what Terraform will create, modify, or destroy, without making any changes. terraform apply performs the same comparison but then executes the changes after you confirm. Always run plan first to review changes before applying them.
How do you add SSL to a DigitalOcean Load Balancer with Terraform?
Add a second forwarding_rule block to your digitalocean_loadbalancer resource with entry_protocol = "https" and a certificate_id pointing to a digitalocean_certificate resource. DigitalOcean provides free Let's Encrypt certificates — create one with type = "lets_encrypt" and your domain name, then reference its ID in the Load Balancer's forwarding rule.